
See more info here LINK
MAKER BUILDS DIY 3D PRINTED AUTOMATIC HACKSAW THAT CAN CUT STEEL

While a 3D printer is a fantastic and extremely versatile tool, many veteran makers will confirm it actually works best in collaboration with other making tools. It’s exactly what makes makerspaces so appealing. But unfortunately most CNC machines or laser cutters are far too expensive for the average home user, no matter how tantalizing they seem. But there are other ways to add new dimensions to your own making HQ, as Engineerd3d’s Bruno M. reminds us. To save a bit of money, he has actually used 3D printed components to build a DIY automatic hacksaw that is strong enough to cleanly cut through steel.
Bruno M. is a New York-based veteran maker, technologist and systems engineer who shares his inspiring building projects on the Engineerd3d blog. Just like many of us, his making capacity is largely limited by his wallet – so he decided to take matters into his own hands. Having set his sights on a DIY CNC machine, he dreaded having to cut countless metal parts by hand and sought a more accurate, low cost solution. “The why is a complex question, but the simple answer is that I needed a tool to cut steel in a precise way so I can build my CNC frame. The other answer is that I don’t mind having another tool around. This is a great way to do both while exercising my brain,” he revealed.

As it makes no sense to break the bank for a tool to build another low-cost tool, Bruno decided to use all his making skills to turn a hand-powered hacksaw into an automatic version. As an avid 3D printer, he immediately saw opportunities to 3D print all the necessary parts surrounding a hacksaw and a clamp. “One does not keep a dog and bark one’s self. I used my machine as prototyping machine as well as a mini factory,” he revealed. “You didn’t think 3d printing was all about downloading files and filling your house with dickbutts or yoda heads, did you?”
This makes this automatic hacksaw a very low-cost solution, which can be built for around $50 or so. Really the only expensive parts are the hacksaw, and the clamp, though you might have some laying around that go unused. Bruno did splurge on the hacksaw to ensure it comes with a good, adjustable blade, but that’s a matter of preferences and priorities.

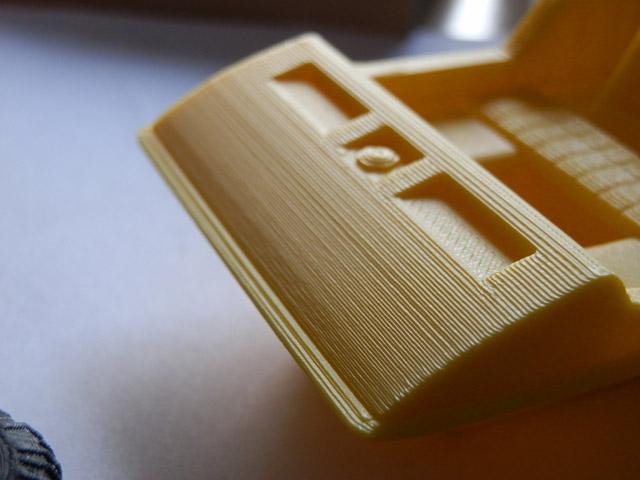
As you can see in the photos above, the saw itself is bolted onto an old Ikea table leg, while Bruno also built a linkage system from 3D printed parts. Looking a bit like a steam locomotive’s driving system, it uses rotary motion (powered by a geared motor) to create a linear sawing motion. All parts are held into place with 3D printed brackets (even the guide that lines up materials is 3D printed), and cutting speed can be adjusted by adding weight to the top.
But the real question is: what can it cut? In the video below, Bruno reveals the saw can even cut through the solid steel of a threaded rod. Using just a bit of oil as lubrication, the saw actually cuts through the 8mm rod in about two minutes. Most importantly, the finished results are very smooth, and perfect for immediate use. “You don’t even need to clean it up. If I had cut this by hand, I would have to file out the top [of the rod] to thread a bolt on it. Can it cut steel? Yes it can,” he says.
While intended for metal parts, the second clip shows that the automatic hacksaw is also a good option for cutting wood. “[The saw] leaves almost like a sanded finish, which is awesome. This is exactly what I was looking for,” he says. By adding a bit of weight, the saw should also become a bit more stable.
If these cool clips are getting your hands itchy, here’s some good news: Bruno has shared all the files, including the Sketchup design files here and invites everyone to adapt it for their needs. You can find the full bill of materials here, as you will need quite a bit more than a hacksaw and a clamp. But with the help of the clips above, it should be a fairly accessible project that can really add a new dimension to your making arsenal.
Getting Those Parts Oriented: Made for Me Releases The Ultimate Guide to ABS 3D Printing
 These days it’s easy enough to unpack that new 3D printer and set off to work with your starter pack of filament, design files ready to go and models on your mind. Or maybe you are printing from a library or a university lab where all of the supplies are already onsite. Your goal is to see a successful print to fruition. But this gets a lot more interesting when you become a bit of a materials scientist, which undoubtedly—and perhaps unexpectedly—you will find happening when you begin to have more demands and curiosity as a user. And if you are working from the industrial front, knowing your materials is not a choice, but a requirement.
A great starting point for learning about materials—and printing—is ABS. Short for acrylonitrile butadiene styrene, the three monomers that make up the popular filament, this material is the main topic of ’The Ultimate Guide to ABS 3D Printing: 5 Things You Need to Know‘, just released from Made for Me, a startup headquartered in both North America and Australia. A marketplace dedicated to connecting designers with industrial 3D printing suppliers, the company was founded in 2014 and has built a global network, allowing for users to get the prototypes and parts they need printed industrially, and with a wide selection.
Made for Me is aware that sometimes you might feel like you are shooting in the dark when choosing a material, preparing for a journey through trial and error to get the desired product; however, a bit of knowledge can make the process a lot easier, and more fulfilling. The five aspects of material usage they are filling you in on here consist of:
- What ABS is made of
- How ABS is printed and how that affects your part
- How layers and filaments can be oriented
- How to orient parts for the most successful print
- What to look for in a 3D printer when you are using ABS
If you’re wondering what ABS is best for, Made for Me suggests you think Legos. They are of course, a perfect vehicle for 3D printing with ABS, showing off its strength, thanks to the acrylonitrile and styrene, with butadiene lending the toughness we are familiar with in the toy building bricks. Obviously, these multi-pronged pieces of plastic—that will have you doubled over in pain in the middle of the night should you have the misfortune to step on one—would seem nearly impossible to break. This is exactly why ABS is such a great material for many different products. While it lacks some of the benefits of a filament like PLA that is recyclable, vegetable-based, and nontoxic, ABS offers the rigidity and reliability you may be seeking over everything else.
ABS material is meant for the more ubiquitous FDM or FFF 3D printer. Here, the hot end melts the filament and then applies it on the print bed, building your model layer by layer, and allowing you to orient them simply by choosing how the part is situated on the bed. Orientation may not be something you initially give a lot of thought to or even understand, but you do need to consider several things.
How are you orienting the layers within the part? Depending on the shape, as in a small rectangular part, where you want to lay the orientation flat on the XY plane, or on edge on the XZ plane, or standing up on the ZX plane, the layers can be oriented to your preference.
“If you pull on the part from end to end, the layers will either be oriented in the same direction as the load (XY and XZ), or perpendicularly to it (ZX).”
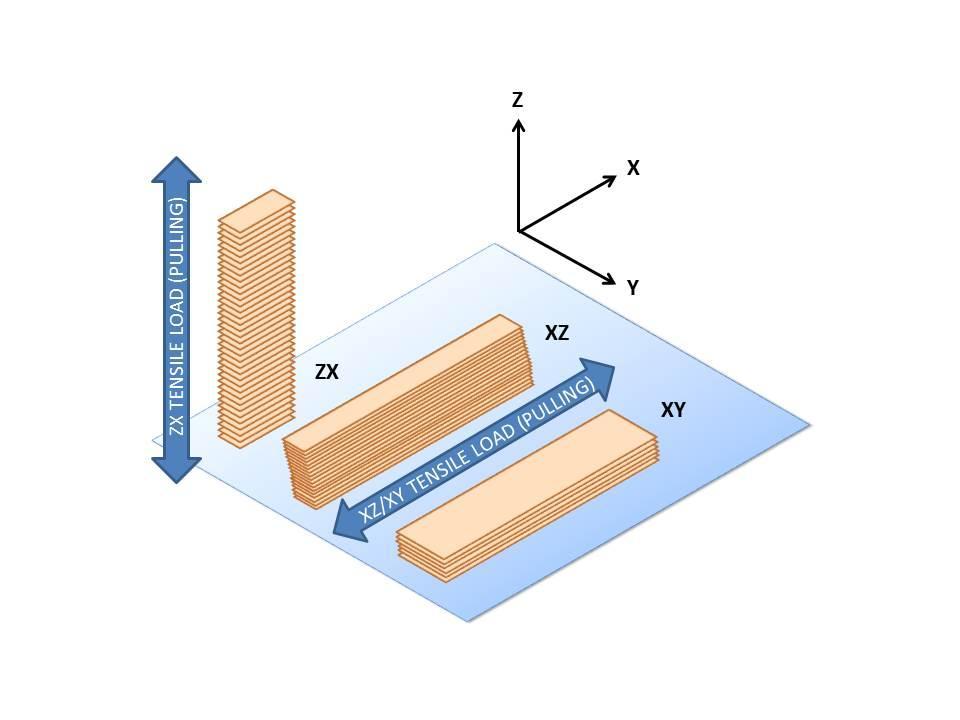
Depending how you lay the part on the plate underneath, the layers will be oriented differently within the part.
What you need to consider is what impact orientation is going to have on the integrity of your 3D printed object. As the Made for Me team points out in their new guide, orientation will play a substantial role in the strength of your part. To demonstrate this, they point out how two different studies examining Stratasys ABS-P400 prove the point:
“In both cases, parts printed with filaments at 0-degree orientation performed similarly to injection molded ABS, while parts printed with filaments at other orientations became progressively weaker.”
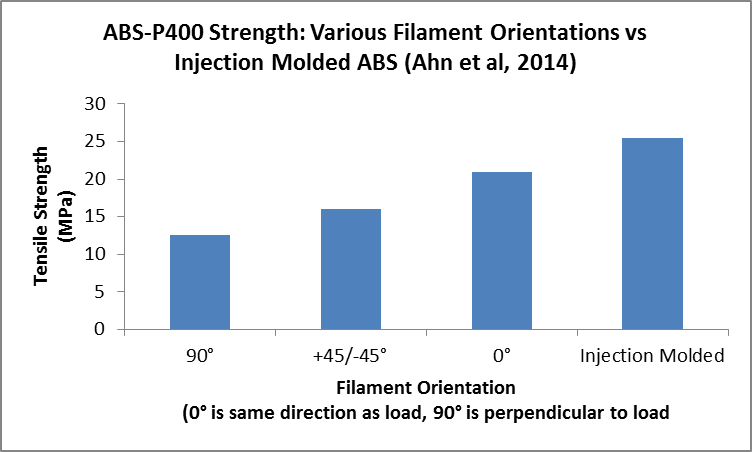
Figure Two
See figures two and three to understand more about how when the filament is aligned with the load, tensile strength can actually rival that of parts made though injection molding, as well as showing a consistent improvement in strength. This means you can use 3D printed ABS parts for functional testing, but as the guide points out, filaments need to be oriented “along the direction of load (0 degrees) for maximum strength.”
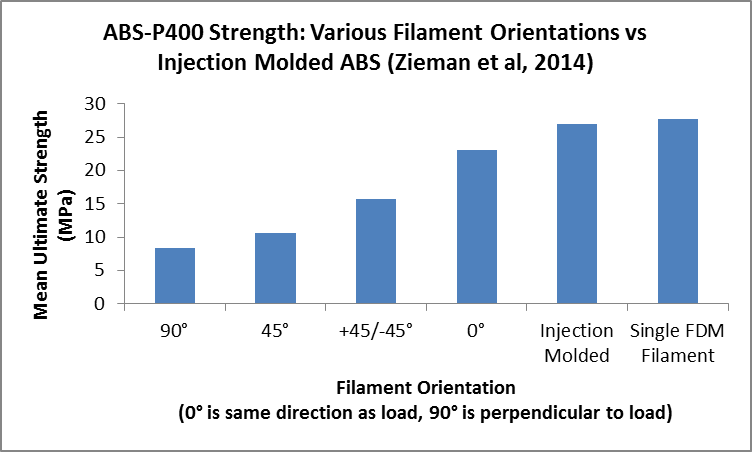
Figure three
Next, you need to consider fatigue, as seen below in figure four, because this is another element which will determine the integrity of your part. With orientation obviously becoming more and more important as the load increases, users who paid close attention to orienting filament saw that their parts were able to withstand three times more cycles.
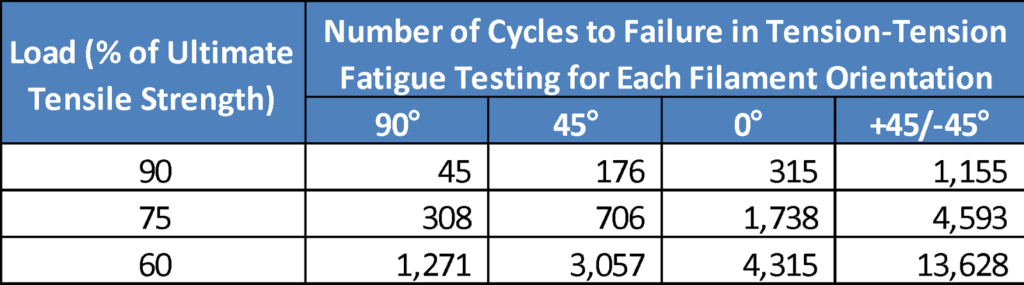
Figure four
“As can be expected, orienting filaments perpendicular to the load is a bad idea,” states the Made for Me team in their printing guide. “However, these tests show that completely aligning each layer’s filaments with the load is not actually best. Instead, criss-crossing layers of +45/-45 degree filament orientations are substantially better.”
Tips for success:
- Make sure that layers run parallel to the load, keeping in mind the example of wood grain, and how it’s weakened substantially when pulled apart perpendicularly.
- When you are in the process of making your design, decide on filament orientation early on. Consider what your requirements will be for strength and fatigue properties and how you will want to control filament orientation layer by layer.
Extra help: For a much stronger part, and especially if you need a functional test prototype, use 100% infill.
It’s also important to think about how orientation is going to affect the surface finish of your print. Again, if orientation is an issue, surface finish will be as well.
 Shallow slopes tend to show the delineation of layers much more clearly—something not desired—so it’s suggested that you minimize that shallowness, thus improving the aesthetics significantly. And if you’ve had any experience with manually removing supports, you’re probably aware of how this has the potential to mar or even wreck your model. If possible, try to minimize how much support (and the removal thereof) is visible.
It’s also very helpful, of course, if your 3D printer has dissolvable supports. And this brings up the topic of choosing the appropriate 3D printer. Is ABS most likely going to be your material of choice? Are you going to be printing for functional parts, prototypes, or a different need? While it’s expected that you are looking for quality and speed, also be sure to consider:
- Build volume – this should be your first consideration, as it makes the difference often between whether or not a print can be completed in one piece or has to be broken up into multiple pieces to complete the job.
- Layer height – this can vary by printer, and often you may find a desktop 3D printer has a more desirable thickness. Keep in mind that you may need to rely on post-processing finishes regardless.
- Temperature control – it’s no secret that temperature is a huge quotient in the success of your print. Even the smallest variations can cause issue, so if you are interested in successful, quality prints, be sure to keep in mind that you will need a thermal environment you can control. Consider how well you can control this in the build chamber, how reliable temperature controls are in terms of the hot end, and whether or not the print bed is heated.
- Types of materials supported – you may find that there are numerous ABS materials that can be used for your 3D printer, and for the desktop numerous variants and additives are available. Generally though, you will find the greatest quality and reliability in commercial printers which use materials exclusively from the manufacturer.
- Availability of dissolving support material – this is definitely worth looking into. For dissolving supports, a second print head is responsible for washing parts directly after printing, allowing for a better surface finish.
In conclusion, here are the main points you should take from the guide: It’s very important to understand, ultimately, how your 3D printer works, and how its particular features will affect your print. Choose your 3D printer with an idea of materials in mind up front. Look at what print volume will be available to you, along with layer height, temperature controls, allowance for variables, and whether or not the printer can dissolve supports. Keep in mind that ABS is a versatile material, and you may run into varying properties. It’s important to know what these are exactly, along with being able to orient your parts correctly. If you learn to do so, the reward will be strong parts that are resistant to fatigue and have a superior surface finish. Read the full guide here. Is this information that’s useful for your printing purposes? Discuss further in the ABS Printing Guide forum over at 3DPB.com.
XYZprinting da Vinci 1.0 Pro 3D Printer Review: Good Prints, Disappointing Scans
THE GOOD
- Most 3D prints had excellent quality, with fine detail
- Can use third-party filament
- Laser etcher works well
THE BAD
- Prints at the smallest layer height often did not work
- Printing is slow
- 3D scanner did not work well, often missing parts of objects and not capturing fine details
- Scanning works only over USB, not Wi-Fi
VERDICT
This 3-in-1 from XYZprinting handles two of its tasks (3D printing and laser etching) fairly well, but you'll be disappointed by the 3D-scanning features.
 VERDICT
This 3-in-1 from XYZprinting handles two of its tasks (3D printing and laser etching) fairly well, but you'll be disappointed by the 3D-scanning features.
The XYZprinting da Vinci 1.0 Pro 3-in-1 has a lot of numbers in its name, because it does a lot of stuff. For $899, you get a 3D printer that can print with ABS and PLA filament, along with a 3D scanner. For an extra $99, you can add a laser engraver that can etch wood, plastic and other materials with 2D images.
The da Vinci Pro 3-in-1 does a decent job at two of its tasks: 3D printing and engraving. But the 3D scanner did not work well, making this device a jack of all trades, master of none.
VERDICT
This 3-in-1 from XYZprinting handles two of its tasks (3D printing and laser etching) fairly well, but you'll be disappointed by the 3D-scanning features.
The XYZprinting da Vinci 1.0 Pro 3-in-1 has a lot of numbers in its name, because it does a lot of stuff. For $899, you get a 3D printer that can print with ABS and PLA filament, along with a 3D scanner. For an extra $99, you can add a laser engraver that can etch wood, plastic and other materials with 2D images.
The da Vinci Pro 3-in-1 does a decent job at two of its tasks: 3D printing and engraving. But the 3D scanner did not work well, making this device a jack of all trades, master of none.
THE GOOD
- Most 3D prints had excellent quality, with fine detail
- Can use third-party filament
- Laser etcher works well
THE BAD
- Prints at the smallest layer height often did not work
- Printing is slow
- 3D scanner did not work well, often missing parts of objects and not capturing fine details
- Scanning works only over USB, not Wi-Fi
VERDICT
This 3-in-1 from XYZprinting handles two of its tasks (3D printing and laser etching) fairly well, but you'll be disappointed by the 3D-scanning features.
VERDICT
This 3-in-1 from XYZprinting handles two of its tasks (3D printing and laser etching) fairly well, but you'll be disappointed by the 3D-scanning features.
The XYZprinting da Vinci 1.0 Pro 3-in-1 has a lot of numbers in its name, because it does a lot of stuff. For $899, you get a 3D printer that can print with ABS and PLA filament, along with a 3D scanner. For an extra $99, you can add a laser engraver that can etch wood, plastic and other materials with 2D images.
The da Vinci Pro 3-in-1 does a decent job at two of its tasks: 3D printing and engraving. But the 3D scanner did not work well, making this device a jack of all trades, master of none.
Design: Make Some Room
This large, imposing printer will take up a lot of desk space: At 22 x 20.5 x 18 inches, the da Vinci Pro 3-in-1 isn't going to fit into a tiny corner. A bulky, red-and-black plastic case encloses all of the features, with a door at the front that opens to reveal the 3D printing, scanning and etching area. Another door on the top provides access to the cavity where the filament cartridges fit.
 The heated print bed can handle a print of up to 5.9 inches high, wide and deep, providing an impressive 205 cubic inches of print volume. XYZprinting recommends using painter's tape and white glue to help prints stick to the print bed, and the company includes three sheets of tape with the printer. Most of the prints we made stuck well to this combination of heat, tape and a bit of glue, though it's rather easy to damage the tape when removing the print, meaning you have to replace the entire sheet. The da Vinci Pro 3-in-1's print bed is definitely not as tough or resilient as the plastic bed on printers such as the LulzBot Mini.
The 3-in-1 includes USB and Wi-Fi, but the latter is a little limited. You can use the 3D-printing and laser-etching functions over a Wi-Fi network, but not the 3D scanner, which requires a USB connection.
Print Materials: Broad Support
Support for third-party materials distinguishes XYZprinting's Pro lineup from its amateur offerings. Whereas printers such as the da Vinci 1.0 AiO work only with filament in XYZprinting's own print cartridges, the Pro can handle these cartridges and 1.75-mm filament from other manufacturers. That said, XYZprinting does still try to nudge you toward using its own filament; when you start the companion software, a pop-up message warns you, "Print quality may vary with third-party filament."
The heated print bed can handle a print of up to 5.9 inches high, wide and deep, providing an impressive 205 cubic inches of print volume. XYZprinting recommends using painter's tape and white glue to help prints stick to the print bed, and the company includes three sheets of tape with the printer. Most of the prints we made stuck well to this combination of heat, tape and a bit of glue, though it's rather easy to damage the tape when removing the print, meaning you have to replace the entire sheet. The da Vinci Pro 3-in-1's print bed is definitely not as tough or resilient as the plastic bed on printers such as the LulzBot Mini.
The 3-in-1 includes USB and Wi-Fi, but the latter is a little limited. You can use the 3D-printing and laser-etching functions over a Wi-Fi network, but not the 3D scanner, which requires a USB connection.
Print Materials: Broad Support
Support for third-party materials distinguishes XYZprinting's Pro lineup from its amateur offerings. Whereas printers such as the da Vinci 1.0 AiO work only with filament in XYZprinting's own print cartridges, the Pro can handle these cartridges and 1.75-mm filament from other manufacturers. That said, XYZprinting does still try to nudge you toward using its own filament; when you start the companion software, a pop-up message warns you, "Print quality may vary with third-party filament."

This large, imposing printer will take up a lot of desk space: At 22 x 20.5 x 18 inches, the da Vinci Pro 3-in-1 isn't going to fit into a tiny corner. A bulky, red-and-black plastic case encloses all of the features, with a door at the front that opens to reveal the 3D printing, scanning and etching area. Another door on the top provides access to the cavity where the filament cartridges fit.
The heated print bed can handle a print of up to 5.9 inches high, wide and deep, providing an impressive 205 cubic inches of print volume. XYZprinting recommends using painter's tape and white glue to help prints stick to the print bed, and the company includes three sheets of tape with the printer. Most of the prints we made stuck well to this combination of heat, tape and a bit of glue, though it's rather easy to damage the tape when removing the print, meaning you have to replace the entire sheet. The da Vinci Pro 3-in-1's print bed is definitely not as tough or resilient as the plastic bed on printers such as the LulzBot Mini.
The 3-in-1 includes USB and Wi-Fi, but the latter is a little limited. You can use the 3D-printing and laser-etching functions over a Wi-Fi network, but not the 3D scanner, which requires a USB connection.
Print Materials: Broad Support
Support for third-party materials distinguishes XYZprinting's Pro lineup from its amateur offerings. Whereas printers such as the da Vinci 1.0 AiO work only with filament in XYZprinting's own print cartridges, the Pro can handle these cartridges and 1.75-mm filament from other manufacturers. That said, XYZprinting does still try to nudge you toward using its own filament; when you start the companion software, a pop-up message warns you, "Print quality may vary with third-party filament."
Fictiv’s Manufacturing Platform Officially Launches, To Include 3D Printing & CNC Machining Capabilities
 While numerous proponents of 3D printing around the world work tirelessly toward seeing that everyone experiences the affordability and accessibility of the technology that is impacting so many different sectors with great and positive substance, often we just consider those goals to be directed at the novice, individual desktop user or for the classroom—and often in developing areas when it comes to education.
But another very important ‘developing area’ is that of businesses who have 3D printing needs but lack industrial or commercial equipment. This is where Fictiv comes in. We haven’t checked in with Fictiv since last year, when the fledgling, web-based platform that distributes 3D printing jobs to the appropriate venues was partnering with San Francisco based 3D printing company Moddler. Now, they are officially launching the company, proven and with a strong network in place.
“Fictiv dramatically reduced our iteration time by getting us high quality prints within days, with no extra time spent on our end preparing parts for a print, setting up a printer, or cleaning and finishing parts,” said Abe Fetterman, CTO at Nomiku. “Fast turnaround and less hands-on time meant our time could be spent where it was needed most: designing our product.”
 As a manufacturing platform, the Fictiv goal is not just to give small enterprises a way to meet their 3D printing needs but to do so at unprecedented speed, with the goal of transforming the hardware development process altogether due to their vetted and growing network of 3D printing machines.
“When building hardware products, speed to market is everything. By providing 3D printed parts in 24 hours, engineers and designers are able to bring their ideas to reality, ultimately accelerating innovation. Fictiv is grateful to work with incredible customers and partners and the team is excited to take another step towards democratizing manufacturing,” Dave Evans, co-founder of Fictiv, told 3DPrint.com.
They have also just announced the addition of CNC capabilities to their network as well. This means customers have access to precision prototypes quickly, and while it might be considered more traditional technology, this means that Fictiv’s platform is not limited. The focus is on quality and speed, speed, speed!
“We founded Fictiv with the vision to build a more efficient manufacturing ecosystem,” said Evans. “Fictiv is designed to empower engineers and designers with the tools and expertise needed to produce better hardware products, in significantly less time.”
With CNC machining capabilities on the menu as well, users know that they are able to dip their toes in the water and check components out before going full force in manufacturing. Parts meant for high-precision performance can be fully tested before high-volume production begins, covering parts for applications in areas like automotive, aerospace, medical and consumer electronics.
“The real cost of hardware development is the time wasted in the inefficiency of prototyping products,” said Evans. “With Fictiv, our customers get CNC or 3D printed prototypes quickly and seamlessly, while benefitting from a wide variety of machines and materials that enables engineers to find the right tool for the job. This greatly accelerates their development cycles for faster iterations to give our customers an unparalleled competitive advantage.”
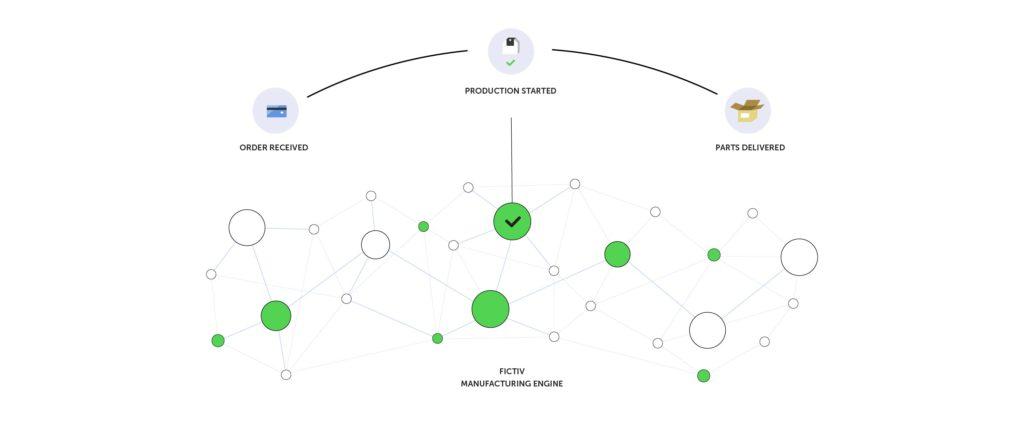
Rather than turnarounds of three weeks, customers will enjoy seeing their prototypes in three days. That type of speed is extremely beneficial in the workplace, allowing for immediate feedback, streamlined workflow, and better products all around. When an engineer comes to Fictiv with a project, all they have to do is upload their drawing and look forward to a quote within the hour. After the order is placed, the design is matched with the appropriate vendor who has an available machine.
Companies like Radicand, a design consulting firm and incubator, are already reaping the benefits:
“Creative hardware engineering requires that Radicand continuously test the limits of what we can do, which can mean tough fabrication challenges when we prototype,” said Scott Steber, Director of Engineering. “Fictiv gives us one platform to manage all of our prototyping projects, regardless of material or size specifications and the insight from their engineers has been valuable in getting us better parts, faster.”

Dave Evans & Nate Evans, founders of Fictiv
CNC machining from Fictiv is available for the following materials:
- Plastics
- ABS
- Nylon 6/6
- Polycarbonate
- Delrin 150
- Metals
- 6061 Aluminum
- 303 Stainless Steel
- 304L Stainless Steel
- 316L Stainless Steel
The company’s ‘distributed approach’ not only promotes streamlined workflow and allows for accessibility for small businesses, but local manufacturing ecosystems are supported, using their equipment to greater capacity rather than watching it sit idle. Fictive sees it as their responsibility to contribute to building a distributed and agile economy.
“The US was once the center of manufacturing in the world,” says Nate Evans, co-founder of Fictiv. “Today the country is still filled with some of the best manufacturing minds and expertise globally. However, many of these shops have been left behind without the needed technology and tools to compete against larger, centralized manufacturers.“Fictiv is building a technology infrastructure to allow engineers and designers better access these experts, while catalyzing local economies to spur growth.”
No comments:
Post a Comment